Thats right people... I got my hands on one of these little gems. As some of you may know not only am I a commission painter and hobby blog writer I am also a member of the Privateer Press Press Gang. And this past year was the 10th anniversary for Warmachine and for the Press Gang. Well Mr. Will Hungerford our Quartermaster and the rest of the crew from Privateer Press set out to do something cool for the members of the Press Gang. That something cool was to come up with an alternate sculpt just for us.
For me this piece means coolness and competition so I decided that I needed to pull out all the stops and give this model the best paint job I have ever given a model before. And this also means that I had to make him look better than the standard Gorman that I have in my Khador army. This whole project was going to be a challenge so off to work I went.
The first hurdle for me was how am I going to base the model... well he is a pirate themed sculpt so he need to be on the wood planking of the deck of a pirate ship. And me wanting to do something more competition minded I decided that I would use a Resin Display Plinth that I picked up from Secret Weapon miniatures about a year ago. I was going to use it for a different project if I ever got around to it... but Pirate Gorman deserved it more.


So with the wood planking all laid out and lined up so that the gaps between the boards lined up on both the removable base and the display plinth. I set about scoring a wood grain into the planks and I just simply stained the boards using Sewer Water wash also from Secret Weapon Miniatures.
Now onto Pirate Gorman himself.
I set about painting him using mostly Reaper Master Series paints triads and I just thinned them down even further than they already are so that I would be working in more thinner layers so I could try to achieve more of a subtle color modulation. The blue on the cloak took over an hour by itself for example. I also decided to use a little OSL for the green glow on some of his alchemical grenades that he carries.
So I really took my time with this model cause I wanted him to look good and I wanted to show off more of what I could do on single models and not just bulk painting. I am super pleased with how well this model turned out. And I think he will serve his desired purpose very well.
Here is the first of what I am planning will be three Sanguinary Priests for my Blood Angels Project. This one just happens to be the Finecast model with a little kitbashing fun added in... like the winged jump pack and the plasma pistol and the shoulder pad stolen from the Death Company sprue. I decided to go with the winged jump pack on this guy too because that is going to be a running theme through out the whole army when it is all said an done.
The model is mounted on one of the Ruined Temple resin bases from my friends over at Secret Weapon Miniatures. Which that is also going to be a theme for the army. It took me several days of going back and forth before I finally decided on these bases and let me tell you... I am glad I chose these, as they really are kick ass bases.
Paint wise this is the red that I think I am going to go with for all the models in the army. I am not trying to win any Golden Daemons or anything like that with this army I just want them to look good and draw some attention. When this army is all done I want people to stop and look at them and be like "that is a good looking army". BUT that is still a long way off as there is still a bunch more stuff to paint and a few more things that still need to be bought for them.


As you all know I am a huge fan and supporter of our friends over at Secret Weapon Miniatures. Mr Justin is an awesome person to deal with and not only do they have great products they have great customer service.
Well some of you may know that I am not the greatest fan of Kickstarter... well honestly I think I might just have to eat my words on this one. Cause Mr Justin just today has launched a Kickstarter that I would love to support and I recommend that all of you at least take a look at it and consider getting in on it as well. Secret Weapon is proud to present their Tablescapes line. It looks like they are going to come in sets of 16 12"x12" tiles that will make a 4'x4' board on the Kickstarter he also has a set that contains 32 tiles so you can make a 4'x8' board. As I understand it from watching the video on the Kickstarter page the 16 tiles are all different so you will have hundreds of different combinations to put them together so every battle will be different. The Tablescapes are made from an injection molded plastic and not some soft poured plastic or resin. So they will be sturdy. Also they are held together with little clips that go in the corners so you wont have to worry about the tiles shifting and your models getting knocked about.
So what about the price you ask... well for a set of 16 tiles on the Kickstarter it is $150 and for the 32 tiles it will run you $250, and those prices include shipping. Mr. Justin is hoping to have them ready to be shipped out by October according to the info on the Kickstarter. Now lets compare this for a second to the Realms of Battle Board and tile expansion set from GW. The Realms of Battle board comes as a set of 6 2'x2' tiles so you can make a 4'x6' table for $290 and for another $99 you can get 2 more tiles giving you a 4'x'8' board, bringing that total to $389. So for a much higher quality 4'x'8' board that you have almost unlimited options for a layout you can spend $250 for a set from Secret Weapon Miniatures... or if you are a GW fanboy you can shell out almost $400. Personally I would rather spend the $250 for the board from SWM and then take the money that I saved to buy some matching terrain or resin bases.
Thats right people... the Tablescapes don't end with just the 16 tile sets... which according to the video that Mr. Justin made there are going to be several different sets designed to match some of the different base sets that they produce. Let me say that again... they are making the boards to match their resin bases. How awesome would that be to have your awesomely painted miniatures mounted on some of SWM bases and be playing on a board that actually matches the bases. Now let me take this one step further... IF I understood everything correctly in the video and from what I read on the Kickstarter page there is also going to be a modular wall set to match the boards as well. Talk about having a themed army and table... honestly how cool would this be. Personally I can't wait for the Ruined Temple set to come out so that I can have a matched board for my Blood Angels to play on.
So go to KICKSTARTER and please, please, please show your support for Secret Weapon Miniatures Tablescapes Kickstarter so that we have better and way more affordable options than what is already out there for modular gaming boards. I know I have plans on supporting this one myself.

Okay so I know I am always talking about how much I love the bases from Secret Weapon Miniatures. Well here is even more proof of this... I had a little surprise come in the mail the other day (it was a surprise as I was not expecting them yet). I had ordered all of the bases that I needed for my upcoming Blood Angels project... which was a ton of bases.

I had a bit of a tough decision on picking which base I wanted to use. As you know I just finished that commission of the Imperial Guard models where the client wanted the models on the Flagstone bases from Secret Weapon, and I really liked the way that those bases looked. So I managed to narrow my decision down to those and the Ruined Temple bases. Well this decision went back and forth for a couple weeks and finally I gave up and sent an email to Mr. Justin and asked him for a little guidance on which bases he thinks would look better for the Blood Angels, and after a short discussion he helped steer me in the direction of the Ruined Temple bases. I do think that they are the perfect bases since they arrived and I had a good chance to take a really good look at them.
Now that I had that decision made the next hard part was "how am I going to paint these bases to make them look really cool?" So I did a couple test bases to see if I liked the idea that I had swimming around in my skull.
I think I am going to stick with this choice cause it does look really cool. The large areas are painted to look like a grey stone and then lines are painted to look like a red stone. I think that this helps tie the bases in with the Blood Angels theme that I am going for with this whole project.
The Studio is one step closer to being able to call this Imperial Guard project finished. With that being said I wanted to show off and do a little review of the large oval bases for the Valkyrie and the Vendetta.
I like these bases a lot (but then I am slightly biased). This is another one of those that Mr. Justin knocked out of the park. They are great quality and are flat enough that you are not forced to place the flight stem on just one way, giving you a couple of options for facing. These would even work great for non-flying models that have to go on the large oval. There is a slight difference between this base and the rest of the bases from this line and that is that it doesn't have the little raised areas (like the ones that I have been painting green on the other size bases). Also there is just a touch of a size discrepancy between these and the "official" GW bases... these are just slightly larger. but unless you place them back to back it is really hard to tell just by looking at them.


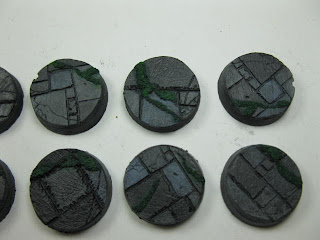
This past week I had a client order some Flagstone bases from Mr. Justin over at Secret Weapon Miniatures. Now this is for an ongoing project that I am working on for my client but I wanted to show you guys these bases.
When they arrived I got them all cleaned up and washed them in warm soapy water like you should do with resin products. And of course I took them out and sprayed them black and got to work getting them painted.
When working with resin bases I personally always paint the models off base and then attach them then they are all finished. I find it easier this way to keep the unwanted paint off the bases or the models. This is my personal preference and some of you might not like doing things that way which is cool... I just prefer to do things this way. Now before I show you how these bases turned out I just have to say that I love the sculpt on these bad boys. As always Mr. Justin knocked this one out of the park and this makes me proud to say that 2Ton Studios uses Secret Weapon products.


As you may have seen in my last post I used several of my supply of 30mm
corpse field bases that I ordered from Mr. Justin for a "Dead Justice"
Malifaux box for the guys over at The Eternal Warrior to give away. Well
I ordered some of each size because I am redoing my Warmachine Demo
sets and I am putting them on resin bases from SWM so they stand out and
maybe get Justin more fans. Anyway I am going to be putting my Cryx set
on these bases. Figured it was a very fitting base idea for the Cryx.
Well here you can see I took a couple of the extras that I had and decided to paint them up now so I could give a review on the bases while I wait on the Cryx set. So in the first photo on this post you can see that I painted up some of the 30mm bases and in these two photos you can see that I decided to do up a 40mm and a 50mm. I chose these extras for my review because I think that they offer a little more detail than the smaller ones.
After I painted and gave the bases a matte coat I decided to attack them with some realistic water that I had sitting on the shelf.
As always these are really high quality resin bases. They have a high level of detail in them and there is a serious lack of air bubbles in the top side of these bases. (the only air bubbles I found were on the bottom of the base which to me is very acceptable). With the amount of detail these theme bases will work great for just about any murderous army. They are also available in beveled edge so you 40k guys dont have to feel left out... especially with the rumors of a new Chaos codex on the horizon. Just think about using these theme bases on a brand new World Eater army... really gets those gears turning huh?
To Justin and the crew over at Secret Weapon Miniatures... 2 huge thumbs up guys. I love these bases and I have some really cool plans for these... so keep them in stock cause I am going to be ordering more.
Here is the last product Review that I have for the Gang over at Secret Weapon Miniatures for the March new releases. This time around it is the Gothic Power Generator. This is a really cool looking piece of terrain and will look good in just about any "Gothic Space Game" *cough* 40k *cough*...
This piece is a multi-part resin terrain piece that also comes with 4 acrylic green power rods (which I painted). When you get the model the top and the 4 supports are attached to a sprue so you do have to cut some pieces off. In the instructions that come with the model it says use a hobby knife (which I don't recommend unless your insurance is paid up and you don't mind a trip to the ER) or a hobby "bone" saw. Which is the method I think is best if you don't mind spending a lot of time trying to cut the parts off... I cheated and put my diamond cut off wheel on my Dremel and went to town. IF YOU DO THIS MAKE SURE YOU WEAR A MASK. Resin dust can be hazardous to ones health and this is something I recommend to everyone no matter what company's resin you are working on. So please be careful.
Then it was time to prime the little monster but first I dry fit everything to see how it went together and once I realized that how the whole thing goes together I decided to glue the supports to the base first then I primed the whole thing (rods and all) black and went to town painting it. I painted the structure using Reaper Master Series Natural Steel Triad. Then I added a little gold and some blues and the top and base were ready to go. Then onto the Rods... which like I have already said I decided that I wanted to paint mine cause ever since the Necrons first came out a long time ago I hated those green rods... so with those painted I shot the whole thing with a coat of matte varnish then I brushed on some gloss varnish onto the power rods.
So my review of this is that it is a great piece of terrain that anyone can build and everyone should have one or 2 of these on their boards. It sells for $20us and being that it is resin and not cheap plastic it is WELL WORTH the price. Really this is a cheap piece of terrain to own. I got mine all ready to go in an afternoon so they don't take long to get together. It takes even less time if you leave the rods green. So next time I decide to clear off the game table in the studio and play a game of 40k this will make a great addition to my terrain collection. Overall I give this one a 5 out of 5 because of the cheap price and ease of assembly and overall looks.
So Great job to Mr. Justin and the gang over at Secret Weapon Miniatures for another great product. I cant wait to see what they do for their next release in May.


Okay this is more of a follow up to the review that I posted up earlier this week. I figured I wrote such good reviews for the leaves I better use them on bases all by themselves so you really can see them in the act.
First up is the Leaf Litter. I actually did a little bit of a blend with the dark and the light and then I made up a couple bases and painted them like normal. Then I used a little thinned out white glue (cause I am all out of matte medium) and glued down some leaf litter. Then once it was dry I just hit it with a little matte varnish as per usual.

In this shot you can see that I have used a little thinned out white glue again to apply some leaves to one of the bases that I made up and painted. I then sprayed it with matte varnish when everything was dry.

So when I checked the studio mail a few weeks back I had a few new products from Mr. Justin over at Secret Weapon Miniatures. The new releases for March had some really cool new basing materials this time around along with a cool piece of terrain for 40k. This is the second part of the review for the scenic basing materials that I ordered.
Secret Weapon Scenics Masterclass: Leaf Litter (both light and dark green)
This product retails for $4.99us and you get about 60ml of a natural green leafy material that looks like amazingly realistic leaves you would see scattered on the ground. Though it makes the box smell like someone has been cooking Italian food or something cause it smells like oregano or thyme
This product falls into that category of products that I really love that Mr. Justin has come up with. Though I would really like to know how he came up with this one cause is a really good idea. and being that it is a Natural material makes it even cooler to me cause it means that someone really had to think outside to box to figure out how to re-purpose this one. Like the Fallen Leaves I would recommend applying the leaf litter by using a matte medium cause the thinned out white glue or scenic cement will dry glossy. But if you are going for a "wet" look then by all means go for it. One more thing on both leaf litter and fallen leaves... a little goes a long way. You can easily go overboard with these and it will lose its realistic look.
So from me it's another 5 out of 5 on this one Mr. Justin... Keep up the food work.

So when I checked the studio mail a few weeks back I had a few new products from Mr. Justin over at Secret Weapon Miniatures. The new releases for March had some really cool new basing materials this time around along with a cool piece of terrain for 40k. I am going to start off with the basing materials and it will be a 2 part review, the first of which is going to be the Fallen Leaves.
Secret Weapon Scenics Masterclass: Fallen Leaves - brown
This product retails for $4.99us and you get about 60ml of a natural "pod like" material that looks like amazingly realistic leaves you would see scattered on the ground in the fall. (that is unless you live in the desert or the tropics).
This product falls into that category of products that I really love that Mr. Justin has come up with. I don't know where he found it but I think it is truly awesome. When the product came in the mail I sent Justin an email asking about it so I could get a little more insight to what it is before I wrote this review. And he replied that it is something that has been around in the historical miniature circles for a long time and that he wanted to bring it to our end of the hobby pool cause it does look so realistic. I also asked him the best way to apply it... If the old standby of thinned out white glue or scenic cement would work best or if he had better suggestion, and he said to use a matte medium cause it wont dry glossy looking... Unless you are going for a "wet" look. Then the other option works just fine.
So from me it's another 5 out of 5 on this one Mr. Justin... Keep up the food work.

So the other day I was having an conversation with Mr. Justin over at Secret Weapon Miniatures and we got to talking about razor wire. And how I preferred the "wire wrapped around a wire" type that you can get from either Games Workshop or Army Painter. And he preferred the stuff that he sells which is a flat brass etched razor wire. So I ordered some of his cause I wanted to see the difference first hand cause he was adamant that his looked better. Of course I had seen it used in pictures and in videos that he had done on his site about how to use his masterclass kits.
Well when it arrived this is what you get. It is a flat sheet of very thin brass and you have to cut it off the frame to use it. If you were to cut it all off and separate it out there is over 18 feet of razor wire here for only $15. I am not sure how much you get from GW but you pay almost $10 and $5 for 8 feet from Army Painter. So the other 2 might be cheaper for the amount that you get but I was starting to lean more to liking the stuff SWM.

So once you get a strip separated from the frame (wear gloves this stuff is sharp)just wrap it around the handle of a paintbrush to achieve a "coil" and stretch it out and bend it into the shape you want like what I did below.

Here you can see that I took the stuff that I got from GW that I used the same method to re-size their coil down to a smaller coil so it looked more like the right scale for the miniatures we use.

Here you can see both the SWM brass etch razor wire next to the GW "wire wrap" razor wire.

Now that I have managed to get my hands on some of the stuff from SWM I must say that Mr. Justin. You have brought me over to your side on this one. I think from now on I am going to use the razor wire from you instead. It does look more realistic and more appropriate for the scale of miniatures that we all know and love.
The only real drawbacks that I can find with this razor wire is the fact that you have to cut it off the frame and the connecting pieces can be hard to see if you got them all. Also this stuff is really sharp. Not as sharp as a hobby knife blade or anything like that but shape enough that its gonna feel like you just got a really bad paper cut. So if you do decide to use this stuff please be careful and I do recommend wearing gloves just to keep from getting cut up. But if you are careful you shouldn't get cut by it.
Over all I would say this one gets a 4.8 out of 5 because its cons are extremely minor and its pros are outstanding, cause lets face it... it really does look more realistic.
Okay I said I was going to post this review then the washes... But I loved the washes so much that they couldn't wait. So On with the Mud review.
What all comes in the kit:
Weathering Pigment: Dark Earth
Weathering Pigment: Terracotta Earth
Weathering Pigment: Clay Brown
Modeling Plaster (approx. 2g)
Fine Grain Sand (approx. 5g)
"Realistic Water" (2 oz. dropper bottle
And Costs $21.50

And as you can see from the picture you are getting the normal amount sold for the weathering pigments. You also get a handy little instruction sheet that I highly recommend you read over it before you start using the kit. The best instructions for this kit are on the Secret Weapon site because you get pictures to follow and the instructions are a little more involved. Which those were the instructions that I followed when I got the kit in my grubby little hands. So I grabbed a spare 50mm round lip base I had in the bucket and got to work. My base once it fully dried and I added a little more realistic water to the base in spots so it looks like water has pooled up to form puddles.
This is my Final Result:

Now... I will warn you that if you intend to use the models in actual play then I would suggest another way to base them because this stuff can and does chip off the base (even if you seal it) if you handle the models a little roughly or put them in and out of their foam homes.
Overall I love the look of the product and I think it would be a great way to base up models for masterclass show pieces. If you run out of plaster, sand, or realistic water Mr. Justin does offer a refill kit that has those items in it. If you run out of one or two of the powders you can buy them separately.
I am going to give this kit two different scores because it really comes down to the intended use of the product. If you are wanting to use it for like a Masterclass competition piece I give the kit a 5 out of 5 because it looks awesome and it is really easy to use. I also love the way that you can get a refill kit if you run out of some of the components. Now for tabletop gamers that want their models to look cool... I give this product a 4 out of 5 because it chip off if you don't get the mix right. Honestly for the gamer side I would suggest that people use Mr. Justin's resin bases rather than this kit just cause I would hate to see people put in all the hard work to have awesome looking bases on their models just to have it chip and break off. But if you are a gamer and you are determined to take that best painted title at a tournament then by all means think about buying this product.
(EDIT: Okay... after a brief chat with Mr. Justin over at SWM I think I know why I am getting the chipping on the mix. I think it is a combination of too much plaster and not enough realistic water. I tried a second base just a few minutes ago and once it gets a full cure I will know for sure if thats the case.)